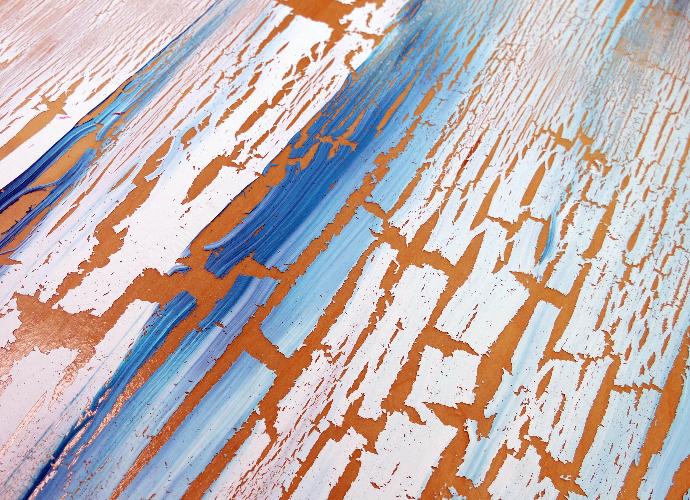
"Cracked" or "crackled" paint finishes are achieved by producing cracks in one layer of paint, which exposes a second layer underneath.
"Craquelure" is something different not discussed here, and refers to the hairline cracks in a varnish characteristic of old paintings. So far true craquelure is not consistently obtainable with water-based paints.
As with any technique, if you've never tried this before it is advisable to practise on some cardboard or scrap material first. The process is fairly straight-forward, but requires some attention to the guidelines detailed below.
Directions :
Step 1
The first coat of paint laid down will be the colour that shows through as the cracks. This first coat should be a water-based paint such as Matisse Flow formula or Matisse Structure Formula or, for larger areas, Matisse Background Colours will give the best results. Leave this coat to dry before going to step 2.
It is possible to omit this coat. If the desired effect is to show the surface as cracks, the Cracking Medium can be applied directly to any surface that acrylic paints will normally adhere to. For example, if cracking on a wood surface and the desired effect is to have the paint cracking to reveal the woodgrain underneath, skip step 1 and start at step 2 ensuring the surface is clean and free of oil, grease and dust.
Step 2
Once step 1 is dry, apply Derivan Cracking Medium (water-based). You can use a brush, sponge applicator or roller (either a sponge or short nap roller). Apply the Cracking Medium so that it is as thick as possible but not so thick that it runs when the surface is held vertically. The Cracking Medium is designed to be a high-build coat; therefore, it is very viscous (thick). Do not be overly concerned with obtaining an even flat surface as the Cracking Medium has a built-in flow agent which will allow it to level out as it dries.
It is possible to thin the Cracking Medium down with water so that it may be sprayed through a spray gun for larger areas. The amount of water used should not exceed 25%. Also keep in mind that the medium must be at least 1-2mm thick to work. Always do a test with the equipment to be used and the dilution rates before embarking on a large project.
Use approved respiratory equipment if using a spray gun, and do not inhale the Cracking Medium.
Step 3
This is the coat that cracks to reveal the coat applied in Step 1. Step 3 must be applied within 12 hours of step 2 drying. The paint used MUST be Matisse Background Colour as the Cracking Medium has been especially formulated to work with this paint. The special formulation, unlike some other brands, allows for different types of cracks to be achieved and repeated with consistency. The Matisse Flow or Structure ranges will not always work as a topcoat with the Cracking Medium unless they are mixed with MM5 Matt Medium (this is discussed further in Cracking Metallic and Tube Colours).
When applying the topcoat, it is important not to re-work areas that have already been covered as re-working an area can lift the cracking coat and stop the process (see below for more details).
How It Works
The old methods of cracking using gum arabic and forced drying were quite unreliable. They relied on the different drying speeds to crack the paint. The climate had to be just right and the slightest mistake would result in the process not working.
The Matisse cracking process relies on a reaction between the topcoat of Matisse Background Colour and the Cracking Medium which has been applied below it. Once the topcoat is applied, the cracking coat below becomes semi-liquid again and shrinks, taking with it the topcoat.
It is worth noting that the topcoat should be applied systematically, covering the surface and not going over an area that has already been covered. As described before, the paints have been designed not to crack; therefore, when the Cracking Medium is trying to shrink and take the topcoat with it, the topcoat is actually trying not to break apart.
The thickness of the topcoat will dictate how big the cracks are. The thicker the topcoat the more easily it is able to hold together and resist cracking but when the Cracking Medium gets its way and manages to crack the topcoat, it will result in a very large crack. Thus the thicker the topcoat of Matisse Background Colour, the fewer the cracks but they will be big ones.
Conversely, if the topcoat is applied very thinly, the Cracking Medium will encounter less resistance from it and therefore result in many more cracks but they will be much smaller in size.
How To Achieve Different Patterns
Following on from above, it can be seen that if the topcoat were to be applied using a brush and brushing in the one direction, the overall pattern of cracks would be in the direction of the brushstrokes. This is because even though one aims, when using a brush, to lay down a nice flat coat, in reality if the brushstroke is studied closely, the topography of the paint has corrugations in it. These corrugations run parallel to the drag of the brush.
As described above, the paint will tend to crack at its least point of resistance or where the paint is the thinnest. Therefore the thinnest parts in a brushstroke are the troughs in the corrugations, which in turn give the elongated cracking pattern.
If a sea sponge is used to apply the topcoat, the topography becomes more akin to sand dunes; therefore, the resultant pattern would be more rounded and random.
Other Influences On Patterns
The types of cracks obtained depend on the thickness of the topcoat and the way in which it is applied. The bottom coat has no bearing on the outcome of the cracking pattern. The way in which the cracking coat is applied will not affect the pattern, unless it is too thin, in which case it just won't work.
The surface on which the finish is to be applied may have some bearing on the pattern. For instance, if very large cracks are desired, the topcoat will need to be applied very thickly. It will be necessary to have the surface horizontal as the weight of the paint may run and pull the cracking medium if the surface is vertical.
On frame mouldings or 3-dimensional pieces the paint, as it cracks, will tend to sink to the lower surface due to gravity. This may leave edges or sharp points exposed and make the piece look contrived.
If the artist is new to this finish, it would be prudent to do some tests on an old sheet of cardboard etc. before a large project is attempted.
Finishing Off
It is not necessary to varnish the cracking finish unless it is to be used on utility items with a lot of wear and tear or if it is to reside outdoors.
The cracking medium may also give a higher sheen to the first coat (i.e. the cracks) than the topcoat. A varnish may be used to even out the different sheen levels as well as protecting the finish from water and some wear and tear.
Use only a solvent-based varnish such as MM14 Final Varnish Gloss Finish or MM15 Final Varnish Matt Finish. DO NOT use a water-based varnish as a final coat as it may crack.
Cracking Matisse Structure/Flow Colours
As previously mentioned, the Matisse Cracking Mediums are designed to work only with the Matisse Background Colours as the topcoat. However, it is possible to use Matisse Flow or Structure Formula instead, if you mix the colour with equal parts of MM5 Matt Medium. This mixture may then be applied over the Cracking Medium in the way described above. The MM5 Matt Medium gives the correct ingredients needed to activate the Cracking Medium while reducing the amount of binder in the paint allowing the Cracking Medium to work.
Faux Antique Gilding
One way of producing a beautiful old cracked gilded frame is to gild a frame and wait 200 years. Another much quicker way is to imitate the finish. This is done via a series of steps set out below:
Step 1
Basecoat the project with Matisse Background Colour (the colours most often used are china red, burgundy and pale beige.)
Step 2
As above, apply the Cracking Medium and leave to dry.
Step 3
Mix Matisse Flow Metallic Light Gold with MM5 Matt Medium in equal parts and apply with a sea sponge or brush by dabbing in a perpendicular motion to the surface. Leave to dry for 48 hours.
Step 4
Using a rag soaked in MM20 Water-Based Patina, add a little dab of Matisse Flow Formula raw umber and wipe this over the surface. The raw umber should catch in the cracks and "dirty" the piece up, giving a time worn look (see the section on antiquing for more details).
Presto! One antique faux gilded frame. With a little practice, it is possible to achieve a finish that is uncannily close to the real thing. For instance, keep in mind that gold leaf is usually applied in sheets of 5 to 10 cm so every 5 or 10 cm if the gold is applied a little thicker, it will resemble the overlapping of the sheets.

To install this Web App in your iPhone/iPad press ![]() and then Add to Home Screen.
and then Add to Home Screen.
